Glossary - Terminology for pressure measurement instruments
Relevant standards: DIN 16086, IEC 61298-2
13.08.2020
Instrument types
Pressure sensors
Membranes with elements applied whose physical properties change when the membranes deform (strain gauges with changing resistance, for example).
Pressure transmitters
Transmitters for converting the pressure to be measured into a defined or standardised analogue and/or digital output signal.
Pressure transducers
Pressure sensors that have a process connection and electrical connection (e.g. connector) but do not convert pressure into a standardised electrical signal like a pressure transmitter.
Types of pressure measurement
Differential pressure measurement
The measurement of differential pressure of two different pressures. The measuring instrument has two pressure connections.
Absolute pressure measurement
The measuring result is always the deviation to the absolute zero (vacuum).
e.g. 4mA = 0bar (= vacuum); zero point (ZP): 0bar


Relative pressure measurement (DIN 16086: overpressure)
The measuring result is always the deviation to the current, absolute atmospheric pressure.
e.g. 4mA = 960mbar (= atmospheric pressure); zero point (ZP): 0bar


Main features
Nominal pressure measuring range
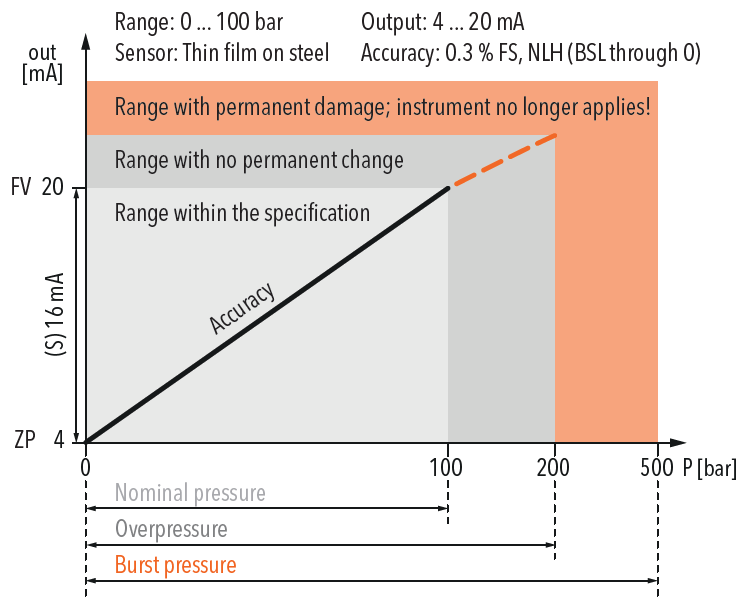
Range between the upper and lower limits of the size measured (operating pressure). The specified accuracy remains within this range.
Measuring span
Algebraic difference between the upper and lower limit values of a certain measuring range.
Overpressure (Max. working pressure)
Highest pressure specified by manufacturer for which the pressure transformer is designed at maximum temperature. The pressure transformer can be loaded up to this pressure without the guaranteed metrological properties having changed after going back into the measuring range. However, there is no longer a clear link between pressure and output signal in the range between nominal pressure and overpressure.
Burst pressure
Pressure value (static) at which the measuring instrument suffers permanent damage. The instrument can withstand pressures up to this value without bursting and will not leak any measuring medium.

Accuracy
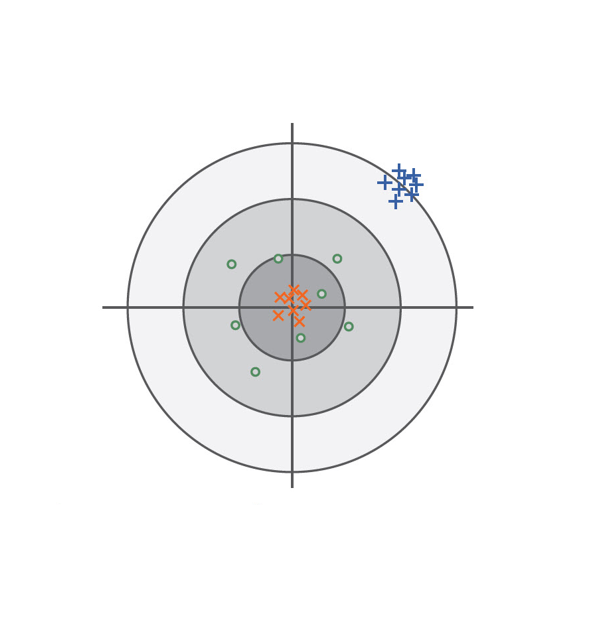
Typical accuracy
(Typical) Mostly corresponds to the 1-sigma value of the normal distribution, i.e. approx. 68.3%. Generally, well over 75% of all Trafag instruments meet this typical measured value.
Maximum accuracy
(maximum) 100% of all instruments meet this maximum measured value.
Non-linearity
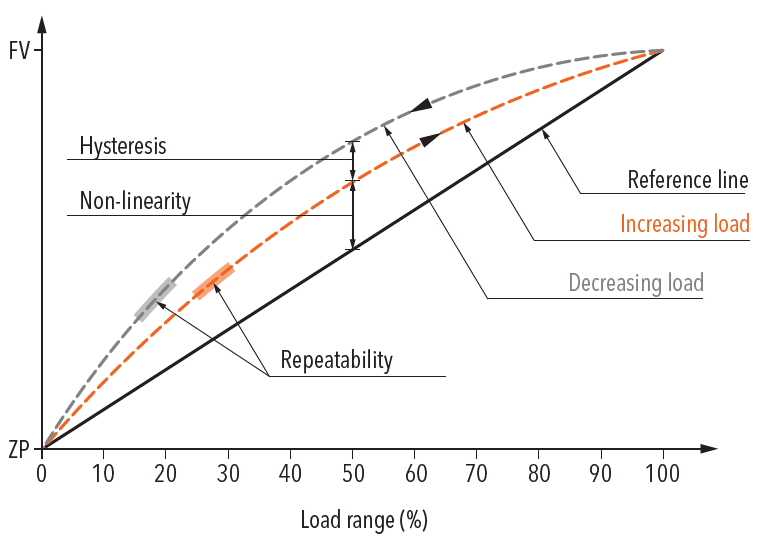
The largest deviation from the effective characteristic line of an ideal reference line. The reference line can be defined as a limit point adjustment, a BSL or a BSL through 0.

BSL Best Straight Line
The reference line according to the BSL or the minimum value adjustment is placed in such a way that the maximum positive and negative deviations are as small as possible.

BSL through zero
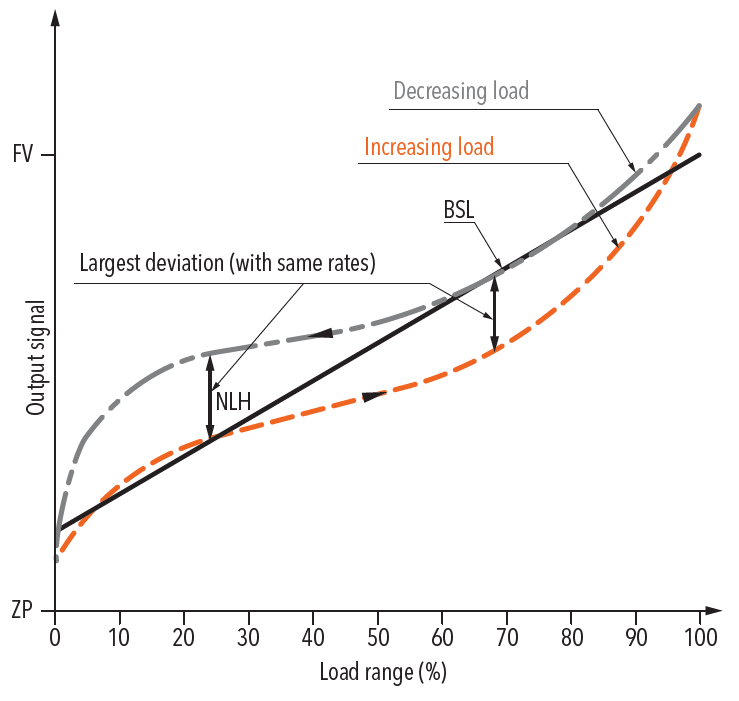
As an additional requirement for the minimum value adjustment, the BSL through zero (also BSL/0) must go straight through zero or the origin.
Non-linearity according to limit point adjustment
The reference line runs through the origin and end point of the characteristic line. Non-linearity indicates the greatest deviations from this line.
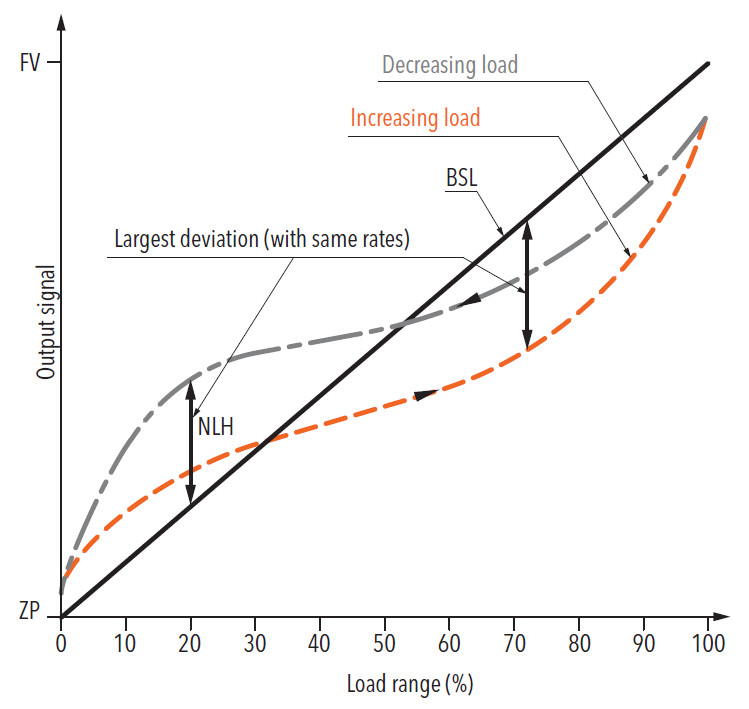

Hysteresis
Property of an instrument for yielding different output values in relation to its input values, which are dependent on the effective direction in which the input values are created (acc. to IEC 61298-2).
Pressure hysteresis
The difference that occurs at the same pressure between measurements in the direction of increasing and then decreasing pressure.
Temperature hysteresis
Maximum change of the zero point and output span for the pressure signal after specified temperature cycle over the operating temperature range.
NLH non-linearity and hysteresis
Largest deviation from the ideal characteristic line (BSL, BSL/0 or limit point). In pressure measuring instruments, the non-linearity and pressure hysteresis are given together at a constant temperature.
Accuracy DIN 16086: Measurement deviation
The accuracy denoted in the standard DIN 16086 with measurement deviation (at 25°C reference temperature) includes all deviations as a result of non-linearity, hysteresis, non-repeatability, zero point (start of measuring range) errors and span (end of measuring range) errors. Zero point errors and span errors also include the measuring uncertainty of the configuration ensemble.
Repeatability DIN 16086: Non-repeatability
Deviation of the output signals with same input signals under identical (established) application conditions.
Temperature coefficient TC
Change of measured value for zero point and span as a result of changes in temperature.
Long-term stability Long-term drift
The change of accuracy due to aging under certain reference conditions during a certain period of time, typically 1 year.
TEB Total error band
Total error (root from sum of the square of the deviations) due to measurement deviations (accuracy) and temperature influence (temperature coefficient TC). The temperature influence is usually given in the information from Trafag across a range larger than that given in the standard (-10 ... +60°C). Whilst DIN 16086 also continues to add to the long-term stability over a year, the information from Trafag is subject to ex-works conditions for obvious reasons.
Scale accuracy
For pressostats: Deviation arising from the manual switch point adjustment with the help of the display (scale).
Electrical Data
Output
Electrical signal that emits the value of the measurement size for further processing.
Rise time (Step response)
The time it takes for an output signal after a severe pressure change to increase from 10% to 90% of its final value that results from the change in pressure.
Zero point ZP
Output signal in the pressureless state (Pmin), e.g. 4mA at 0bar (Pmin)
Final value FV
Output value of the largest pressure value in the nominal pressure range (Pmax), e.g. 20mA at 100bar (Pmax).
Span S
Final value (FV) – zero point (ZP) = span (S)
e.g. span (S) = (FV) 20mA - (ZP) 4mA = 16mA
Switching differential Pressostats
Range within which the micro-switch in pressostats switches on and off.
E.g.
X...X = adjustable value
X – X = non-adjustable value; runs proportional to the nominal pressure
X = fixed value
Limiter Pressostats
Pressostat with manual micro-switch reset.
Environmental Conditions
Media temperature
Instrument property for functioning in an environment with electromagnetic interference and for not unduly influencing this environment (to which other equipment also belongs).
Ambient temperature, Operating temperature
Temperature range in which the measuring instrument adheres to its specifications. As the electronics in certain instruments are more sensitive to temperature than the sensor element, the maximum ambient temperature for the instrument is lower than the permissible media temperature.
Storage temperature
Temperature range in which the measuring instrument can be stored or transported without permanently changing the measuring characteristics.
Protection
Humidity and dust shield according to IP classes in accordance with EN 60529.
Burst
Immunity to recurring, rapid, transient electrical disturbances
EMC Protection
EMC Electromagnetic compatibility
Instrument property for functioning in an environment with electromagnetic interference and for not unduly influencing this environment (to which other equipment also belongs).
Immission
Immunity to external electromagnetic disturbances.
Emission
Interference emission from electromagnetic disturbances.
Surge
Immunity to unipolar surge voltages that can occur due to surges as a result of switching operation and lighting.
Burst
Immunity to recurring, rapid, transient electrical disturbances
Do you have any questions about the glossary?
We'd be glad to help. Please get in touch with us.

