Gauging, calibrating, adjusting — What are the differences?
Gauging, calibrating and adjusting - all have something to do with accuracy and measurement. However, the way in which this is done and the accuracy that can be achieved are very different.
The measured variable of pressure is physically defined in terms of kilogram and meter. These two variables are reference standards, which are derived from natural constants.
p=F/A (with F=m*g)
p: pressure; F: force; A: area; m: mass; g: gravitational acceleration
Gauging
A product is gauged against a national reference standard, such as the «primary kilogram». Originally, this was kept as a platinum-iridium cylinder in a vault in Paris until 2019. Now, the kilogram - as well as the meter - is derived from a natural constant: The exact value of the kilogram, for example, will in future be derived from Planck´s constant. It links the amount of energy of a light wave with its frequency and always has the same value. Via its unit of measurement [kg m2/s], Planck´s constant is clearly related to kilogram - and thus also to meter and second.
Gauging is a test prescribed by law for the compliance of a test equipment with the prescribed measured values according to the Weights and Measures Act. Gauging may only be carried out by public authorities, the gauging offices. Furthermore, only measuring instruments whose design has been certified as calibratable in an approval procedure can be gauged. In general, the Weights and Measures Act was introduced to protect the consumer: All measuring instruments, of which the result is converted into a monetary value for the customer, are subject to obligatory gauging. This also includes deadweight testers.


Calibration
Calibration means that a calibration laboratory compares the reading from a measuring instrument with a reference instrument or a standard or reference. Put simply, during a calibration, a calibration laboratory carries out a target/actual comparison. The result of the calibration is documented in the calibration certificate. The calibration certificate also contains information about the object to be calibrated or the test object, the reference(s), test setup, test sequence and the ambient conditions during calibration. Calibration does not involve any permanent intervention in the measuring instrument.
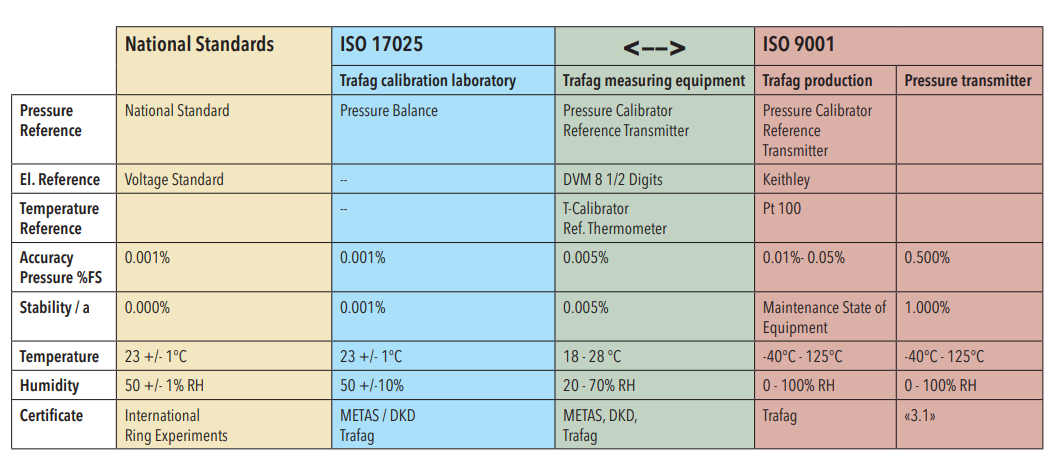
The quality management standard DIN EN ISO 9001 prescribes a test equipment management with regular inspection of the test equipment. For reasons of cost, however, ISO calibration is often performed on measuring instruments with a low to medium influence on the end product. All ISO calibrations meet the following requirements:
- References are traceable to national or international standards. These are calibrated on an annual basis.
- A detailed description of the measurement procedure and, if applicable, the standard/guideline used
- A warm-up time of at least 4 h in the calibration laboratory
- The ambient conditions are documented
- Checking the measurement results using the four-eye principle
- Evaluating the measured values with the specified manufacturer tolerances
Adjusting
In contrast to gauging or calibration, an adjustment always means a permanent intervention in a measuring instrument by the calibration laboratory. During an adjustment, the exact value is determined with the measuring instrument at a known reference. The measuring instrument stores the adjustment value and takes it into account during the next measurement. Depending on the measuring instrument, one measuring point or several measuring points can be adjusted by the calibration laboratory. Adjustment is partly by potentiometer, but also partly via menu or PC software. Since an adjustment represent a permanent intervention in a measuring instrument, the measuring instrument for which an adjustment is necessary after calibration (as found) is subjected to a further calibration after adjustment (as left). Only with this calibration service, a continuous tracking of all measurement results and the detection of measurement errors through calibration is possible.


Do you have any questions about gauging, calibrating, adjusting?
We'd be glad to help. Please get in touch with us.
Do you like to read the whitepaper later?
Click here to download: www.trafag.com/H70356
